導覽控制器 UINavigationController
前一個章節介紹了如何在多個頁面間切換,這節接著要介紹一個相當常見的元件:導覽控制器 UINavigationController,可以更為方便的掌控頁面切換。
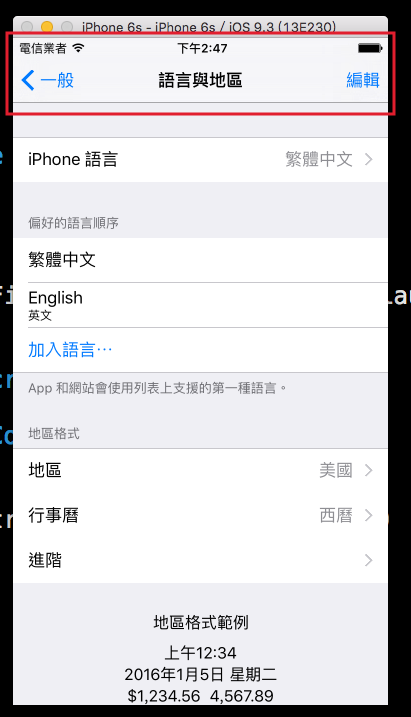
導覽控制器就像是一個容器,裡面可以用來放置及疊放各個頁面,畫面上方預設會有一個導覽列( Navigation Bar ) ,其中可以放置標題及按鈕,來切換或退出頁面,像是內建的 設定 App 就是一個例子,如下:
手動建立頁面
在講導覽控制器之前,要先介紹如何手動建立頁面。最一開始有提過這本書的內容都是以純程式碼為主,但實際上每次新建一個 Single View Application 類型的專案時,這個專案已經都內建了一個 Storyboard 以及相關的設定,這小節會介紹如何移除掉內建的 Storyboard 並手動建立頁面。
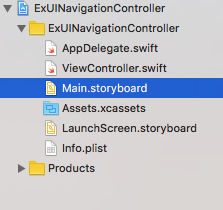
第一步先以刪除檔案的方式將 Storyboard 刪除,也就是下圖中列表的這隻檔案 Main.storyboard :
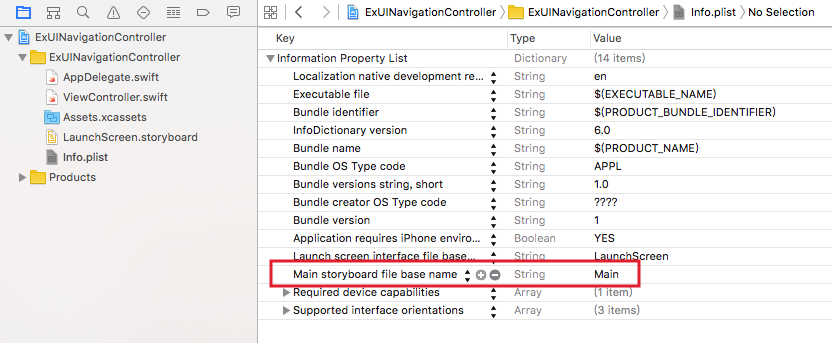
第二步接著看到 Info.plist ,找到並刪除 Main storyboard file base name 這個欄位。(按減號-就可以刪除了。)
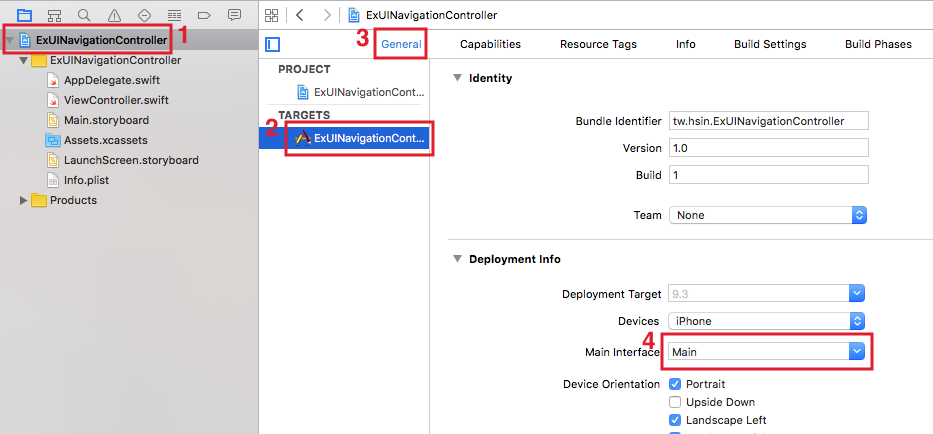
或是將General > Deployment Info > Main Interface這個欄位清空,如下:(這邊的設定會與上面指的 Info.plist 設定連動,所以兩邊清空其中一個,另一個就會一併清空,沒有的話就通通清空。)
最後一步轉往到 AppDelegate.swift ,在UIKit 初探有提到,這隻檔案是負責應用程式的生命週期,所以接著要在AppDelegate類別中的application(application: UIApplication, didFinishLaunchingWithOptions launchOptions: [NSObject: AnyObject]?) -> Bool方法中手動加上頁面,這個方法執行的時間點在應用程式啟動後:
func application(application: UIApplication,
  didFinishLaunchingWithOptions launchOptions:
  [NSObject: AnyObject]?) -> Bool {
    // 建立一個 UIWindow
    self.window = UIWindow(frame:
      UIScreen.mainScreen().bounds)

    // 設置底色
    self.window!.backgroundColor = UIColor.whiteColor()

    // 設置根視圖控制器
    self.window!.rootViewController = ViewController();

    // 將 UIWindow 設置為可見的
    self.window!.makeKeyAndVisible()

    return true
}
上述程式中,先建立一個 UIWindow ,用來顯示應用程式所有畫面的視窗,有點像是桌面程式的視窗,不過在寫 Mac 應用程式時可能會有多個視窗可以切換,而 iOS 下則較為單純,只會有一個視窗,也就是這邊設置的self.window。
接著要為視窗設置屬性 rootViewController 根視圖控制器,也就是應用程式啟動後進到的第一個視圖( View )所處的視圖控制器( ViewController ),這邊設置為ViewController(),你也可以依照需求設置成自己另外建立的 UIViewController 。
最後將這個視窗以makeKeyAndVisible()方法設置為可見的,完成手動建立頁面的步驟。
之後就如同先前的學習一樣,在 ViewController.swift 裡面設置自己需要的功能與元件。
建立 UINavigationController
這個範例的目標如下,建立一個導覽控制器,並內建一個主頁與兩個次頁,可以使用導覽列上的按鈕或是視圖中的按鈕切換頁面:
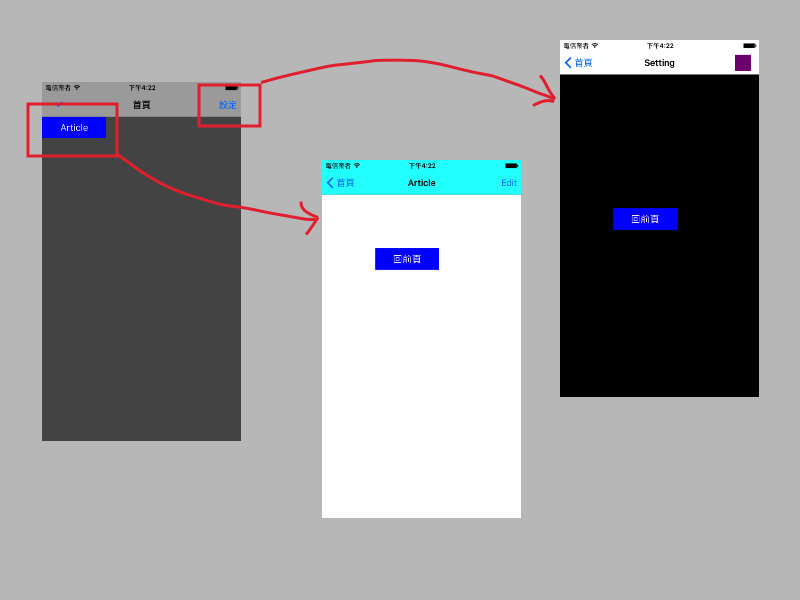
首先在 Xcode 裡,新建一個 Single View Application 類型的專案,取名為 ExUINavigationController 。
接著先以新增檔案的方式加入兩個繼承自 UIViewController 的.swift檔案,分別命名為ArticleViewController及SettingViewController。以及以加入檔案的方式加入一張按鈕的圖片。
AppDelegate.swift
一開始先依據前一小節的步驟移除 Storyboard 檔案與相關設定,接著在 AppDelegate.swift 中將根視圖控制器設為一個 UINavigationController ,如下:
func application(application: UIApplication,
  didFinishLaunchingWithOptions launchOptions:
  [NSObject: AnyObject]?) -> Bool {
    // 建立一個 UIWindow
    self.window = UIWindow(frame:
      UIScreen.mainScreen().bounds)

    // 設置底色
    self.window!.backgroundColor = UIColor.whiteColor()

    // 設置根視圖控制器
    let nav = UINavigationController(
      rootViewController: ViewController())
    self.window!.rootViewController = nav

    // 將 UIWindow 設置為可見的
    self.window!.makeKeyAndVisible()

    return true
}
上述程式可以看到將self.window的rootViewController設為導覽控制器 UINavigationController ,而這個導覽控制器只是一個容器,所以它也需要設置一個rootViewController,這邊則是設置成已經存在的ViewController(),你也可以依照需求設置成自己另外建立的 UIViewController 。
ViewController.swift
接著轉到 ViewController.swift 的viewDidLoad()方法中,將導覽列的設定與按鈕設置寫入:
// 底色
self.view.backgroundColor = UIColor.darkGrayColor()

// 導覽列標題
self.title = "首頁"

// 導覽列底色
self.navigationController?.navigationBar.barTintColor =
  UIColor.lightGrayColor()

// 導覽列是否半透明
self.navigationController?.navigationBar.translucent = false

// 導覽列左邊按鈕
let leftButton = UIBarButtonItem(
  image: UIImage(named:"check"),
  style:.Plain ,
  target:self ,
  action: #selector(ViewController.check))
// 加到導覽列中
self.navigationItem.leftBarButtonItem = leftButton

// 導覽列右邊按鈕
let rightButton = UIBarButtonItem(
  title:"設定",
  style:.Plain,
  target:self,
  action:#selector(ViewController.setting))
// 加到導覽列中
self.navigationItem.rightBarButtonItem = rightButton

// 建立一個按鈕
let myButton = UIButton(frame: CGRect(
  x: 0, y: 0, width: 120, height: 40))
myButton.setTitle("Article", forState: .Normal)
myButton.backgroundColor = UIColor.blueColor()
myButton.addTarget(
  self,
  action: #selector(ViewController.article),
  forControlEvents: .TouchUpInside)
self.view.addSubview(myButton)
上述程式中,首先看到self.navigationController?.navigationBar.translucent這個屬性,用來表示導覽列是否要半透明,但需要在導覽列沒有設置底色時才有這個效果。另外還影響到內部視圖的原點位置,如果設為true,則原點與導覽列的原點一樣,都是整個畫面的左上角,而設為false時,內部視圖的原點則會被設在導覽列下方,你可以將這個屬性設為不同值來看看兩種情況。
接著看到設置導覽列按鈕是使用UIBarButtonItem()方法,而不是原始的UIButton(),它有四種常見的不同初始化方式,這邊先介紹兩個,稍後兩個次頁會分別各介紹一種。按鈕設置完成後要使用self.navigationItem的leftBarButtonItem或rightBarButtonItem屬性來加到導覽列中。
首先兩個方式為,導覽列左邊按鈕是將按鈕設置為一個圖片。而導覽列右邊按鈕則是設置為一個自定義文字。
接著則在ViewController中加上按鈕執行動作的方法:
func article() {
    self.navigationController?.pushViewController(
      ArticleViewController(), animated: true)
}

func check() {
    print("check button action")
}

func setting() {
    self.navigationController?.pushViewController(
      SettingViewController(), animated: true)
}
上述程式可以看到,導覽控制器用來切換頁面的方法為pushViewController(),參數分別為要前往的頁面的視圖控制器及是否要有過場動畫。
ArticleViewController.swift
接著看到 ArticleViewController.swift 的viewDidLoad():
// 底色
self.view.backgroundColor = UIColor.whiteColor()

// 導覽列標題
self.title = "Article"

// 導覽列底色
self.navigationController?.navigationBar.barTintColor =
  UIColor.cyanColor()

// 導覽列是否半透明
self.navigationController?.navigationBar.translucent = false

// 導覽列右邊按鈕
let rightButton = UIBarButtonItem(
  barButtonSystemItem: .Edit,
  target: self,
  action: #selector(ArticleViewController.edit))
// 加到導覽列中
self.navigationItem.rightBarButtonItem = rightButton

// 建立一個按鈕
let myButton = UIButton(frame: CGRect(
  x: 100, y: 100, width: 120, height: 40))
myButton.setTitle("回前頁", forState: .Normal)
myButton.backgroundColor = UIColor.blueColor()
myButton.addTarget(
  self,
  action: #selector(ArticleViewController.back),
  forControlEvents: .TouchUpInside)
self.view.addSubview(myButton)
進到這頁你應該可以發現,導覽列左邊按鈕已經預設為回前頁的按鈕,當然你也可以再重新設定左邊按鈕的功能。
而導覽列右邊按鈕,這邊是第三種方式,設置為系統內建樣式的按鈕,參數barButtonSystemItem提供了很多預設的文字可以設定,使用這個方式的好處是,它會依照你系統預設的語系顯示文字,如果有設置多國語系功能的話,這個按鈕就不需要再設置不同語言的文字。
接著則在ArticleViewController中加上按鈕執行動作的方法:
func edit() {
    print("edit action")
}

func back() {
    self.navigationController?.popViewControllerAnimated(true)
}
上述程式可以看到,雖然導覽列左邊按鈕已經有預設回前頁的按鈕,但這邊仍然建立一個自定義的按鈕,用來示範如何手動設置回前頁,導覽控制器用來返回頁面的方法為popViewControllerAnimated(),參數為是否要有過場動畫。
SettingViewController.swift
最後看到 SettingViewController.swift 的viewDidLoad():
// 底色
self.view.backgroundColor = UIColor.blackColor()

// 導覽列標題
self.title = "Setting"

// 導覽列底色
self.navigationController?.navigationBar.barTintColor =
  UIColor.whiteColor()

// 導覽列是否半透明
self.navigationController?.navigationBar.translucent = false

// 導覽列右邊 UIView
let myUIView = UIView(frame: CGRect(
  x: 0, y: 0, width: 30, height: 30))
myUIView.backgroundColor = UIColor.purpleColor()
let rightButton = UIBarButtonItem(customView: myUIView)
// 加到導覽列中
self.navigationItem.rightBarButtonItem = rightButton

// 建立一個按鈕
let myButton = UIButton(frame: CGRect(
  x: 100, y: 250, width: 120, height: 40))
myButton.setTitle("回前頁", forState: .Normal)
myButton.backgroundColor = UIColor.blueColor()
myButton.addTarget(
  self,
  action: #selector(SettingViewController.back),
  forControlEvents: .TouchUpInside)
self.view.addSubview(myButton)
上述程式可以看到最後一種建立 UIBarButtonItem 的方式,如果前面三種方式都不合你意的話,你可以設置一個自定義的 UIView 來代替按鈕,所以實際上你要擺什麼視圖在這上面都行(大部分元件都是繼承自 UIView)。
以上便為這節範例的內容。
圖片來源
範例
本節範例程式碼放在 uikit/uinavigationcontroller