標籤列控制器 UITabBarController
前面兩節分別介紹了在多個頁面間切換以及導覽控制器 UINavigationController ,這節要介紹另一個也是相當常見的元件:標籤列控制器 UITabBarController 。
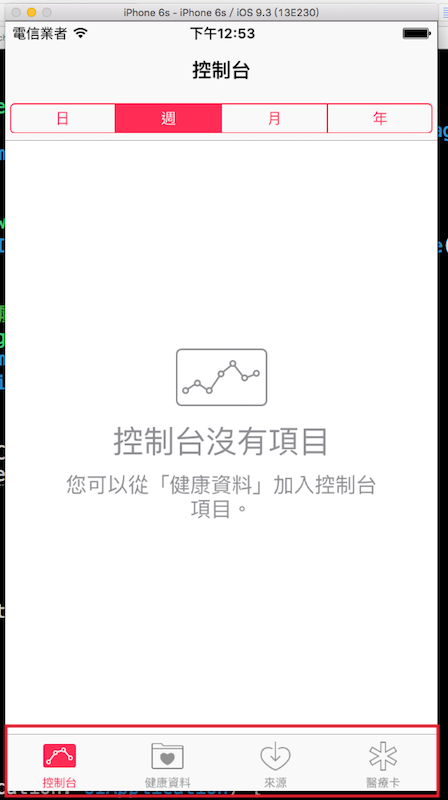
標籤列控制器與 UINavigationController 類似,也像是個容器,可以用來放置多個頁面,不同的地方在於,它會將可以前往的頁面以標籤列的方式列出,像是內建的 健康 App 就是一個例子,如下:
建立 UITabBarController
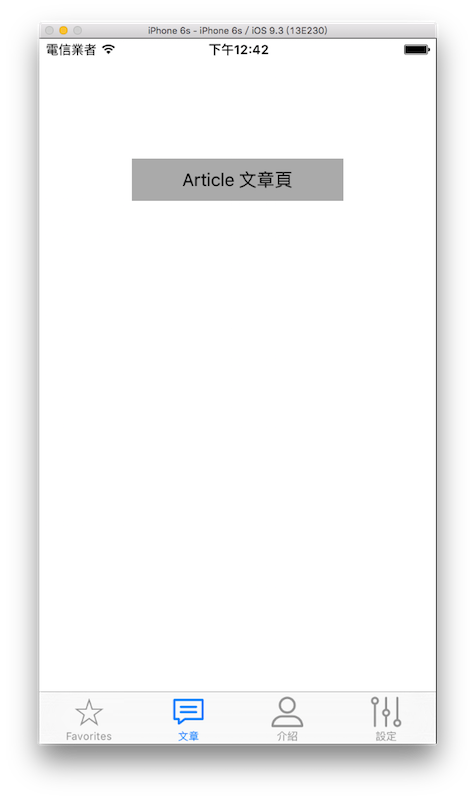
這個範例的目標如下,有四個頁面可供切換,皆列在標籤列中:
首先在 Xcode 裡,新建一個 Single View Application 類型的專案,取名為 ExUITabBarController 。
接著先以新增檔案的方式加入三個繼承自 UIViewController 的.swift檔案,分別命名為ArticleViewController、IntroViewController及SettingViewController。以及以加入檔案的方式加入四張按鈕的圖片。
AppDelegate.swift
一開始先依據手動建立頁面的步驟移除 Storyboard 檔案與相關設定,接著在 AppDelegate.swift 中將根視圖控制器設為一個 UITabBarController ,如下:
func application(application: UIApplication,
  didFinishLaunchingWithOptions launchOptions:
  [NSObject: AnyObject]?) -> Bool {
    // 建立一個 UIWindow
    self.window = UIWindow(frame:
      UIScreen.mainScreen().bounds)

    // 設置底色
    self.window!.backgroundColor = UIColor.whiteColor()

    // 建立 UITabBarController
    let myTabBar = UITabBarController()

    // 設置標籤列
    // 使用 UITabBarController 的屬性 tabBar 的各個屬性設置
    myTabBar.tabBar.backgroundColor = UIColor.clearColor()

    // 建立頁面 使用系統圖示
    let mainViewController = ViewController()
    mainViewController.tabBarItem =
      UITabBarItem(tabBarSystemItem: .Favorites, tag: 100)

    // 建立頁面 使用自定義圖示 有預設圖片及按下時圖片
    let articleViewController = ArticleViewController()
    articleViewController.tabBarItem = UITabBarItem(
      title: "文章",
      image: UIImage(named: "article"),
      selectedImage: UIImage(named: "articleSelected"))

    // 建立頁面 使用自定義圖示 只有預設圖片
    let introViewController = IntroViewController()
    introViewController.tabBarItem = UITabBarItem(
      title: "介紹",
      image: UIImage(named: "profile"),
      tag: 200)

    // 建立頁面 使用自定義圖示 可使用 tabBarItem 的屬性各自設定
    let settingViewController = SettingViewController()
    settingViewController.tabBarItem.image =
      UIImage(named: "setting")
    settingViewController.tabBarItem.title = "設定"

    // 加入到 UITabBarController
    myTabBar.viewControllers = [
      mainViewController, articleViewController,
      introViewController, settingViewController]

    // 預設開啟的頁面 (從 0 開始算起)
    myTabBar.selectedIndex = 2

    // 設置根視圖控制器
    self.window!.rootViewController = myTabBar

    // 將 UIWindow 設置為可見的
    self.window!.makeKeyAndVisible()

    return true
}
上述程式可以看到,如果要設置標籤列的樣式,是使用 UITabBarController 的 tabBar 屬性設置。而各頁面可以使用不同的方式設置標籤列樣式,除了可以使用系統內建的圖示外,也可以設置自定義圖示。
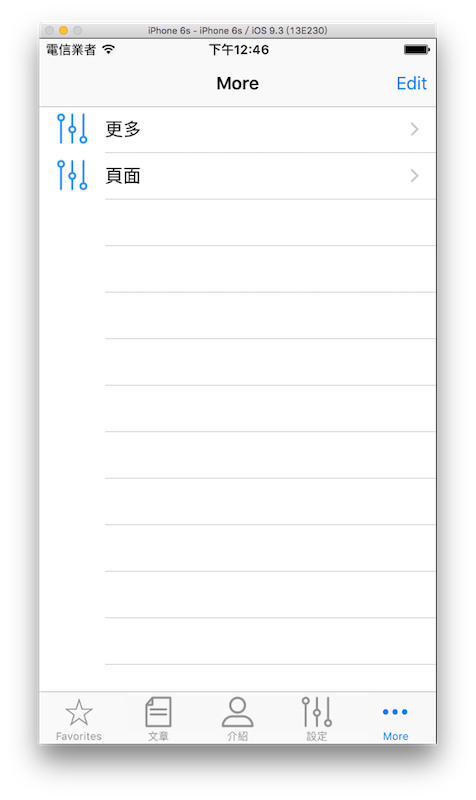
標籤列最多可以放五個圖示,超過的話,最右邊的會變成一個More的圖示,按下後會列出來後續可前往的頁面,如下:
各頁面都放置一個 UILabel 來代表不同內容,這邊便不再複述,完整程式碼請參考文末的範例程式碼。
以上即為本節範例的內容。
圖片來源
- http://www.flaticon.com/free-icon/file_118714
- http://www.flaticon.com/free-icon/speech-bubble_118712
- http://www.flaticon.com/free-icon/profile_118781
- http://www.flaticon.com/free-icon/settings_118769
範例
本節範例程式碼放在 uikit/uitabbarcontroller